
• Home
  • Seller Help
  • Manage Restaurant
  • Quick Links
    • Register Now
    • Seller Login
    • Terms & Conditions
Seller Login
h1-favicon-shape New Project (3)
aratoi
  • Home
  • Seller Help
  • Manage Restaurant
  • Quick Links
    • Register Now
    • Seller Login
    • Terms & Conditions

How can we help you?

Getting Started

4
  • Introduction
  • How it works?
  • Rules
  • Terms used

Web Panel help

23
  • Create Seller Account
  • How to Subscribe to a plan
  • How to Add Store
  • Manage Attributes & variations
  • How to manage Add-ons and add-ons groups
  • Add stock quantity to add-on items
  • How to Add Products?
  • Common Errors while adding a product
  • How to Add FAQ to Products
  • How to Bulk Upload Products
  • Dashboard
  • Point of Sale
  • Categories
  • How to Withdraw my sale earnings?
  • How to run Ad Campaigns
  • Manage wallet
  • Manage Seller notifications
  • Manage my store employees/workmates
  • Manage tax Rates
  • Manage Brands
  • How to Manage Orders
  • Payments
  • Return Orders & Refund

Seller App

5
  • Create Account in Seller App
  • How to Add Store?
  • Create Attributes eg Size:S,M,L
  • Add Product (in Seller App)
  • Add product with Size, Color etc

Sell Fast Tips

7
  • Introduction
  • How to Create Campaign
  • Run Ads campaigns
  • Discounts on Products
  • Who Should use variation products
  • Use High-Quality Product Photos
  • Other tips to sell fast

Restaurant

3
  • Create Restaurant
  • Add-on groups
  • Manage Add-ons using Seller App
  • Home
  • Docs
  • Seller App
  • How to Add Store?
View Categories

How to Add Store?

2 min read

1️⃣ Choose a Plan #

Watch video below

https://oraezo00storage.s3.us-east-1.amazonaws.com/helpvideos/Clean+Select+plan.mp4

Select a plan that suits you.
New sellers can start with the Free Plan (no payment required).

2️⃣ Add Your Store #

Tap Add Store button at the top on the home screen, or
At the bottom of the screen, click More → Stores → Add Store.

Watch video or continue reading below

https://oraezo00storage.s3.us-east-1.amazonaws.com/helpvideos/Clean+add+store.mp4

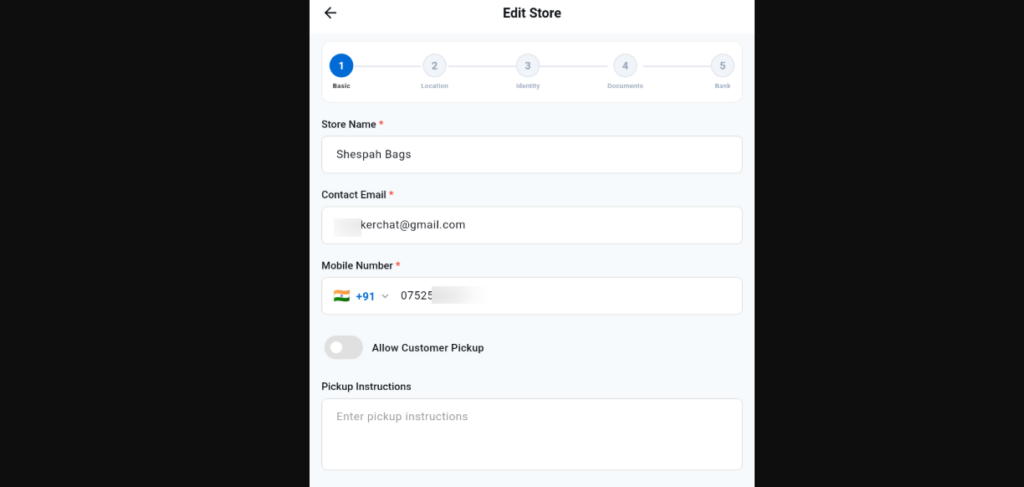
Step1: BASIC #

screenshot 2026 08 06 00 26 58 881 png 900×1600 08 06 2026 12 30 am
  1. Enter store/branch name/business name as it is on your license.
  2. Enter email which will receive notifications for this specific store
  3. Enter your store/branch phone number
  4. Toggle to Allow customer pick up if you would like customers to pick their orders from your store physical location

Step2: LOCATION #


Tap Auto Fetch if you’re at the exact location of your store. This will automatically fill in your store’s address details.
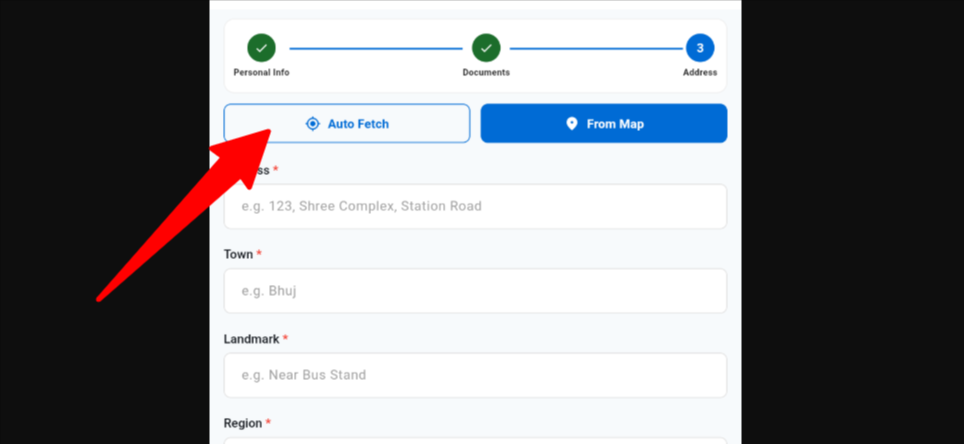
screenshot 2026.08.05 23.58.58.597.png (900×1600).png (1920×948)


Select from Map if you want to choose your store location manually by placing a pin on the map.
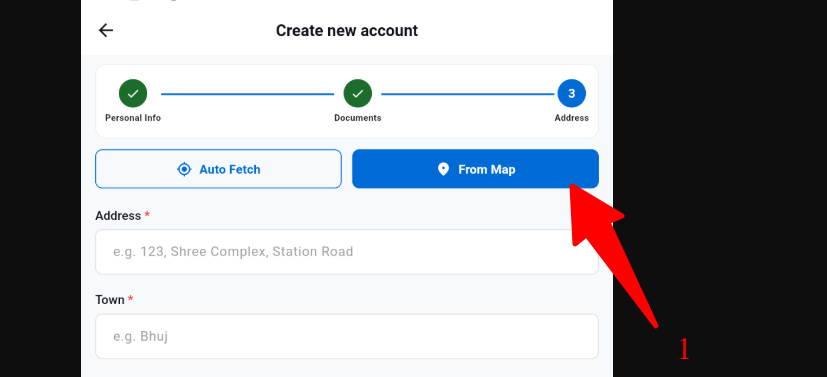
screenshot 2026 08 05 23 58 58 597 png 900×1600 08 06 2026 12 05 am

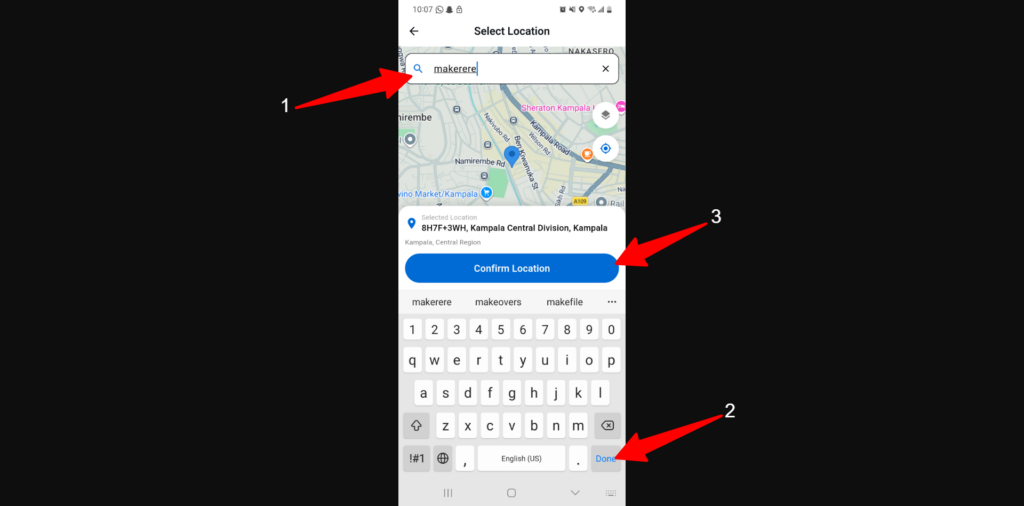
How to select location from Map

screenshot 20260806 100704.jpg (1080×2400) (1)
  1. Type in your store location, building name
  2. Tap Done or click enter to auto search location
  3. Tap on Confirm location

Step3: IDENTITY #


✅ Upload your Store Logo (A square logo is recommended for the best display.)
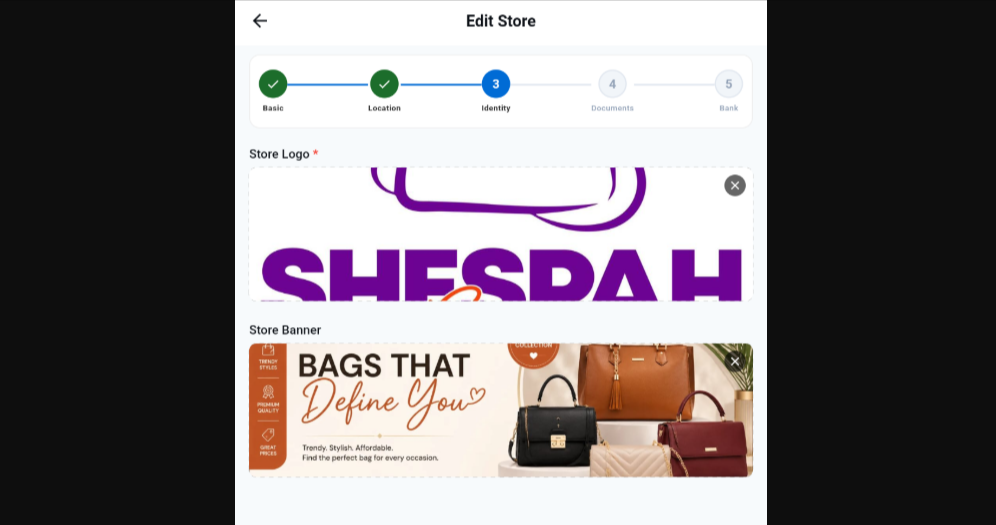
screenshot 2026.08.06 00.41.25.865.png (900×1600)

➖ Upload your Store Banner (A landscape banner is recommended for the best appearance.)

Step4: DOCUMENTS #
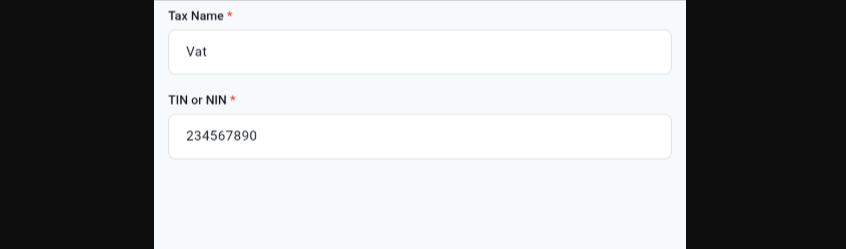
screenshot 2026.08.06 00.42.48.681.png (900×1600)

Address Proof : This can be a photo of your physical store with a poster showing your business name and location. Any government document showing your registered business name and location, rent receipt, electricity bill etc

Statement: upload a bank statement or mobile money statement for the account you want us to send your money after a successful order delivery.

Tax Name: eg VAT

TIN or NIN : Enter your Tin number or enter your national ID number

Step5: Bank #

This is the account we will use to send your payment after a successful withdrawal request.
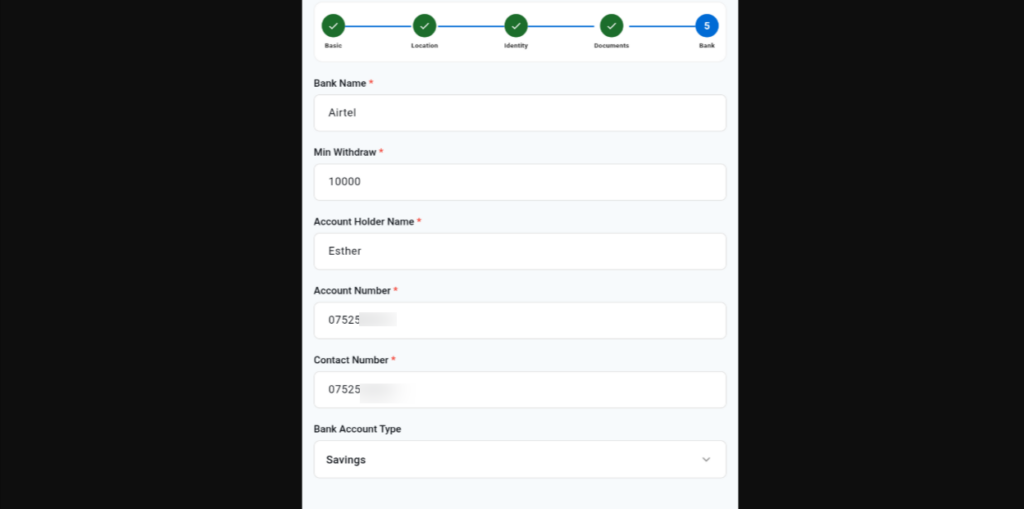
screenshot 2026 08 06 00 45 59 532 png 900×1600 08 06 2026 12 47 am


Enter your bank account or Mobile Money details so we can send your payouts after your orders are successfully delivered.

Don’t have a Business License? #

If you have a National ID and a physical store location, tap Talk to Live Person. Our support team will be happy to guide you through the next steps so you can continue with your seller registration.

What are your Feelings

Share This Article :

  • Facebook
  • X
  • LinkedIn
  • Pinterest
Still stuck? How can we help?

How can we help?

Updated on August 6, 2026
Create Account in Seller AppCreate Attributes eg Size:S,M,L

Leave a Reply Cancel reply

Table of Contents
  • 1️⃣ Choose a Plan
  • 2️⃣ Add Your Store
    • Step1: BASIC
    • Step2: LOCATION
    • Step3: IDENTITY
    • Step4: DOCUMENTS
  • Step5: Bank
    • Don't have a Business License?

Newsletter

Keep up out latest update subscribe to our newsletter!

    Quick Navigation

    • About us
    • Features
    • Pricing
    • FAQ's

    All Page

    • Home
    • Contact
    • Blogs
    • Privacy Policy

    © All rights reserved

    Powered By Araati Uganda